

Overview
Over the years of working with Outlook 365, I’ve seen one common issue that shows up again and again: the OST file quietly grows in the background until it starts eating up the space on the system drive. Microsoft Outlook stores the OST file locally, so users like you and me can access their mailbox data offline, but by default, it’s saved all on the C: drive of the PC. That’s fine initially, but once the mailbox size increases, it starts to show low disk space warnings, slower Outlook performance, and sync-related errors, which are really frustrating.
In real-world cases, moving the OST file to another drive helped you to free up the space and stabilise Outlook without affecting mailbox data. The challenge is that Outlook doesn’t provide a direct option to change the OST file location, like simply copying and pasting the file won’t work—Outlook will recreate it in the original path.
Based on my practical experience in this step-by-step guide, I explain to you how to safely move the OST file location in Outlook 365 without facing any struggles. Before starting, let’s see some reasons to move the OST file Location.
There are various reasons why Outlook users change the OST file Location.
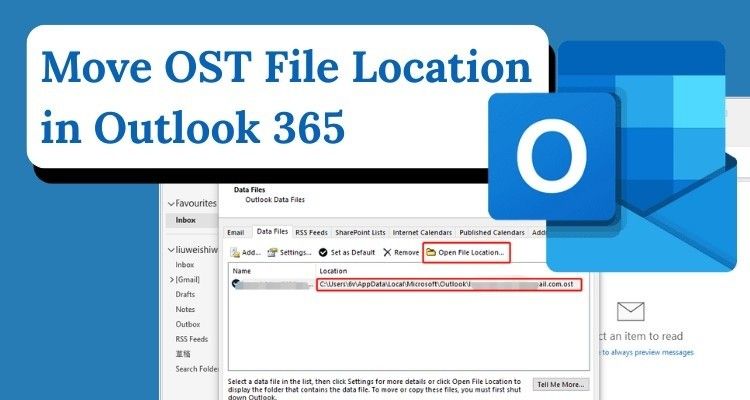
To find the Current Path or location of the OST file:
Drive:\Users\\AppData\Local\Microsoft\Outlook
Drive:\Documents and Settings\\Local Settings\Application Data\Microsoft\Outlook
Below I mentioned some methods that I used and many users used to change their.OST file location
Changing the OST file Location by using the ForceOST registry key. In this method, you will first be required to remove the Exchange account to proceed with the settings. Follow the steps below first:
Press the Win+R keys together to open Run. Type regedit and click OK.
Now, you need to go to Outlook. The exact method depends on the version of Outlook you have. The ways are listed below:
Outlook 2016
HKEY_CURRENT_USER\Software\Microsoft\Office\16.0\Outlook
Outlook 2013
HKEY_CURRENT_USER\Software\Microsoft\Office\15.0\Outlook
Outlook 2010
HKEY_CURRENT_USER\Software\Microsoft\Office\14.0\Outlook
Outlook 2007
HKEY_CURRENT_USER\Software\Microsoft\Office\12.0\Outlook
Outlook 2003
HKEY_CURRENT_USER\Software\Microsoft\Office\11.0\Outlook
You have to make a string value. This string value will be the same for everyone. That is ForceOSTPath. To start, you need to click on the space. This will give you some options. Look for the option and click on it. Then you will see some choices. You have to pick the Expandable String value option. The string value you are making will be called ForceOSTPath.
When you create one, you need to click on the ForceOSTPath value, and then you have to click on the Modify option.
Now, mention the value type and value path.
After the above steps, you can fully configure the Exchange Account with Outlook. Now, your OST file will be saved at the particular path that you select. Using this method, you can change the OST file location in Outlook for Outlook 365 accounts.
Symbolic links are useful to move the path of the Outlook data file from its default place by utilising the MKLINK command. The command helps you to create a symbolic link between the original & new paths.
Here are some techniques that you can use if you are facing the same issue and want to change the OST file location. But sometimes, when performing an OST file location change, the OST file becomes inaccessible or corrupted, and then you can’t access it without fixing it. To solve these types of issues or errors, you need to first recover your OST file. To fix the OST issue, you can use a dedicated tool like OST to PST Converter by GainTools. By using these tools, you can effortlessly fix the corrupted, inaccessible, damaged, and orphaned OST file and save it into PST or many other file formats.
Conclusion
In this guide, I mentioned the best solution that you can use to move your OST file location. And, for corrupted OST files or errors that happen while solving, I provide you with the bounce tip to fix the issue. In the end, you learn step by step to change the OST file Location and store it at the desired path. I hope this will help you, and for more Outlook or tech-related issue solving, you can comment below.
FAQs (Frequently Asked Questions)
Q1. How to Change the OST file Location in Outlook 2016
Ans: To change the location of an OST file in Outlook 2016, follow a few short steps.
Q2. Can an Outlook OST file be Moved?
Ans: Yes, you can move the Outlook OST file at your choice by following the above methods step by step.
Q3. Where is the Default OST file Location?
Ans: Outlook 2019 / 2016 / 2013 C:\Users\<YourUserName>\AppData\Local\Microsoft\Outlook
Outlook 2010 C:\Users\<YourUserName>\AppData\Local\Microsoft\Outlook
Outlook 2007 C:\Users\<YourUserName>\AppData\Local\Microsoft\Outlook
Outlook 2003 C:\Documents and Settings\<YourUserName>\Local Settings\Application Data\Microsoft\Outlook
Outlook 2000 / 2002 C:\Documents and Settings\<YourUserName>\Local Settings\Application Data\Microsoft\Outlook
Q4. How Do I Back Up My OST file?
Ans: You generally cannot directly back up an OST because it’s tied to your mailbox. If you want a backup, you should need to convert OST to PST
© 2025 Crivva - Hosted by Airy Hosting Managed Website Hosting.


