


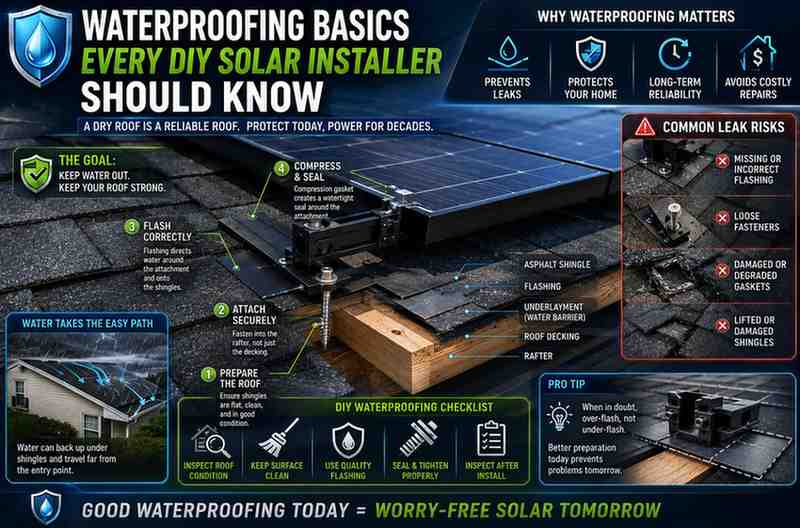
You’ve sized the array, priced the inverter, and mapped your roof’s azimuth down to the degree. But have you thought about what happens the first time a storm drives rain sideways across your new mounting points? For most people tackling a DIY solar install, waterproofing is the part of the job that gets the least attention until a brown ring shows up on a ceiling six months later. It’s not that the topic is complicated. It’s that leak prevention doesn’t feel as exciting as panel specs, so it gets skipped over in the planning stage.
This article covers what actually keeps water out of a penetrated roof, and how flashing, sealant, and mounting hardware need to work together so the system holds up for years, not just through the first dry season.
Every roof penetration is a deliberate hole in a system that was engineered to shed water, not absorb it. A missed flashing detail rarely floods a room right away. Instead, water tracks along rafters or decking, soaks insulation, and shows up as rot or mold weeks or months after the original install.
This is also where climate conditions and roof longevity become directly linked. A flashing detail that holds up fine in a dry, mild climate can fail within a few seasons in a region with heavy freeze-thaw cycling, monsoon rainfall, or prolonged UV exposure. Thermal expansion and contraction around a penetration point works fasteners loose over time, and that movement is exactly what opens a path for water intrusion. Waterproofing isn’t a one-time task performed at install; it’s a system that has to tolerate years of the specific weather your roof actually sees.
Water doesn’t fall straight down and stop. On a sloped roof, it travels downhill along the surface, gets pushed sideways by wind-driven rain, and can even move slightly uphill under wind pressure or capillary action in tight seams.
This means a penetration point isn’t just vulnerable directly underneath the mount. Water arriving from upslope, from the side, or pushed by wind needs a path around and over the flashing, not just a seal at the fastener itself. Any waterproofing plan that only addresses “the hole where the bolt goes” is missing most of the actual water path.
A common misconception among first-time installers is that sealant is the main waterproofing element, and flashing is secondary. It’s the reverse. Flashing is a mechanical water diverter, engineered to shed water around a penetration using overlap and gravity. Sealant is a supplementary, sacrificial layer that fills small gaps and compensates for material tolerances, not the primary barrier.
Flashing installation follows a specific sequence depending on roofing material:
Getting this sequencing backward, sealing a flashing edge that should have been slid under the course above, is one of the most common root causes of solar-related roof leaks.
Sealant plays a real role, but a narrower one than most DIY guides suggest. It fills the small gap between a fastener and the flashing collar, compensates for minor surface irregularities, and provides a secondary barrier if wind-driven rain gets past the flashing’s overlap.
Polyurethane and butyl-based sealants are generally preferred over silicone for roofing penetrations because they maintain flexibility through thermal cycling and adhere well to both metal flashing and roofing substrates. Silicone can shrink and lose adhesion faster under UV exposure and repeated freeze-thaw movement, which shortens its effective service life on an exposed roof penetration.
The mounting hardware itself determines how much waterproofing work the flashing and sealant actually have to do. Rail-based systems distribute loads and penetrations along a continuous rail, resulting in fewer but larger flashed penetrations. Railless or standoff-based systems, including compression-sealed standoff hardware such as E-Air mounts, attach panels directly to individual standoffs rather than a continuous rail, which changes both the penetration count and the flashing detail required at each point.
Someone self-installing a PV system with E-Air mounts needs to pay particular attention to standoff height and the compression seal at each base, since railless systems typically rely on a factory-sealed boot or gasket at the standoff base rather than a site-built flashing detail. That gasket only performs as designed if the standoff is torqued to the manufacturer’s specified range; overtightening can compress and damage the seal, while undertightening leaves a gap for water to work through during wind-driven rain.
Waterproofing at solar penetrations isn’t maintenance-free once the panels go up. A basic annual check, ideally done from the attic side after a heavy rain, can catch a slow leak long before it causes visible ceiling damage. Look for:
Catching a failed seal early is a five-minute fix. Catching it a year later, after insulation and decking have absorbed moisture, is a much larger repair.
Waterproofing a DIY solar install isn’t about applying more sealant. It’s about understanding that flashing does the mechanical work of diverting water, sealant fills the small gaps that flashing can’t cover, and the choice of mounting hardware changes what kind of seal detail each penetration actually needs. Get the sequencing right, match materials to your roofing type, and check the seals periodically. The roof penetrations supporting your array should perform for as long as the panels themselves do.
Solar panels don’t cause leaks; leaks occur from improper roof flashing, sealing, or degraded mounts over time without inspection.
There’s no single best type of flashing; it depends on the roofing material. Asphalt shingles use step or deck-mounted flashing, metal roofs use boots or storm collars matching panel profiles, and tile roofs have flashing shaped to tile contours beneath the tile above the penetration.
Some systems avoid roof penetrations, mainly on flat roofs, but most residential sloped roofs need penetrating mounts for wind and load resistance. Penetration-free systems risk waterproofing issues but add weight and structural changes.
An annual inspection after the heaviest rain season is a good baseline. In climates with freeze-thaw cycles or high UV exposure, more frequent checks are beneficial, as thermal movement speeds up sealant degradation and loosens standoff torque.

© 2025 Crivva - Hosted by Airy Hosting Managed Website Hosting.