


To fix spray foam insulation failure caused by cold weather, you must physically remove all poorly bonded or unreacted material and reapply fresh foam under strict temperature controls. Most spray foam systems require a substrate and ambient temperature of at least 50 degrees Fahrenheit to cure properly. A Professional spray foam contractor uses mechanical scraping and vacuuming to remove brittle or soft “gooey” foam before prepping the surface for a new application.
Fixing these issues requires a careful balance of heat management and surface preparation to ensure the new layer adheres correctly. This guide provides the technical steps and environmental requirements to restore the thermal envelope of your building. Experts in the field agree that rushing a cold-weather application leads to long-term structural and efficiency problems.
The first step to fix spray foam insulation failure. You can tell the foam has failed if it pulls away from the studs or remains soft to the touch weeks after application. Once you identify these areas, they must be cut out entirely back to where the foam is solid and well-bonded.
After removal, you need to bring the area up to the correct temperature using space heaters or infrared lamps. This prevents the new chemical mixture from “shocking” when it hits a cold surface. Industry data shows that approximately 15 percent of insulation issues in northern climates stem from improper thermal management during the initial install.

Understanding the causes of spray foam failure helps you avoid repeating the same mistakes during the repair process. The chemical reaction that creates foam is exothermic, meaning it produces heat. If the surrounding air or the wood itself is too cold, it sucks the heat out of the reaction before the foam can fully expand and harden.
This results in “crawling” or shrinking, where the foam pulls inward as it cools. You might also see “friability,” where the foam turns into a fine powder when touched. These low-temperature insulation issues are common when installers do not use winter-grade chemicals or fail to pre-heat.
When you look for insulation, the technical specifications are the most important factor. Different foam brands have specific “trigger” temperatures for their catalysts. Using a summer blend in the middle of January will almost always lead to a call for a spray foam repair service.
|
Component |
Minimum Temp (F) |
Ideal Temp (F) |
Maximum Temp (F) |
|---|---|---|---|
|
Substrate Surface |
50 |
65-75 |
100 |
|
Chemical Drums |
70 |
80 |
90 |
|
Hose Heat |
110 |
120 |
135 |
|
Ambient Air |
45 |
70 |
90 |
You cannot simply spray new foam over the old, failed material. The dust and chemical residue from the previous attempt will act as a bond-breaker. You must use a wire brush to clean the studs and ensure no oily residue remains on the wood or metal surfaces.
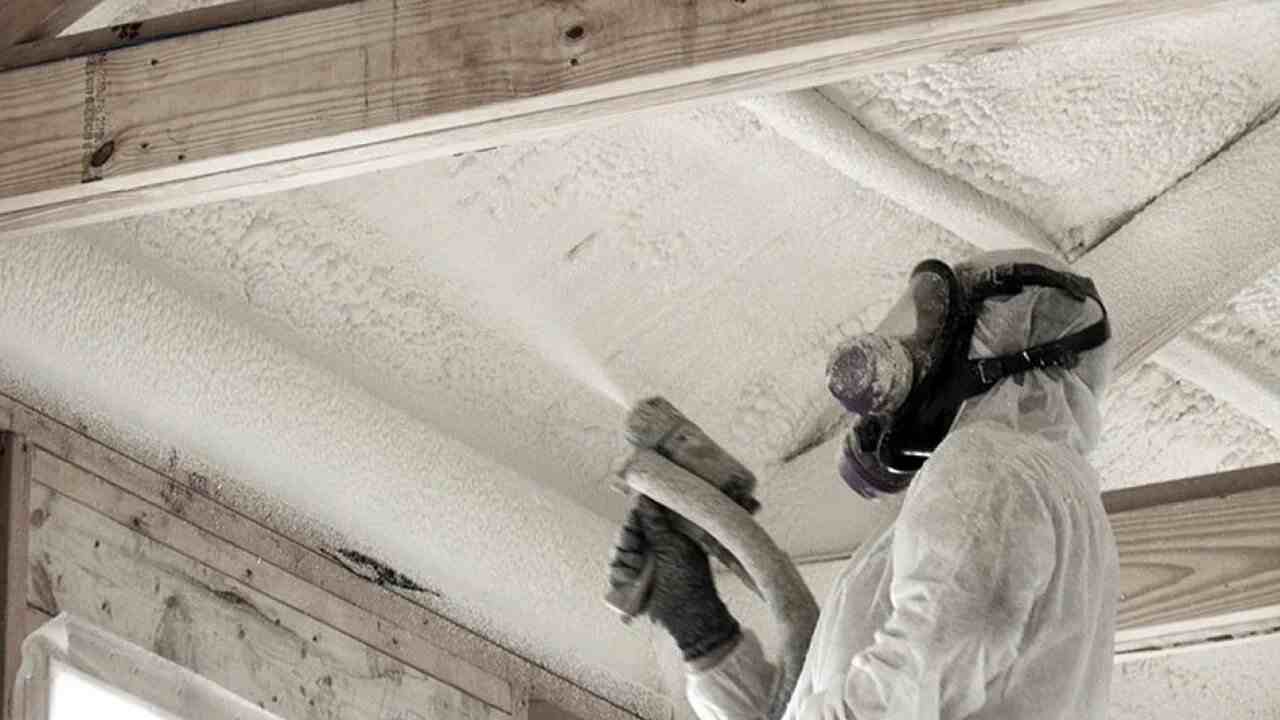
Hiring foam insulation experts is often the only way to guarantee the repair holds. They have specialized equipment, heated hoses, and proportional pumps that keep the chemicals at a precise temperature from the truck to the wall. They also understand the “pass thickness” rules, which dictate how much foam can be sprayed at once to manage heat.
In colder regions like the Pacific Northwest, an experienced spray foam contractor will often use “flash coats.” This involves spraying a very thin layer first to warm up the substrate before applying the full depth. This method ensures the primary thermal barrier stays firmly attached to the building structure.

If you are wondering how to fix spray foam yourself, you will need more than just a ladder. A multi-tool with a serrated blade is best for large sections of foam. You will also need a digital infrared thermometer to check surface temperatures across different parts of the wall.
Temperature variations can occur even within the same room. A corner near a concrete foundation might be ten degrees colder than the center of a wall. Professional crews use these thermometers constantly to ensure every square inch meets the manufacturer’s requirements for fixing a spray foam insulation failure.
Before you decide to move forward with a repair, look at the weather forecast for the next 48 hours. If a major cold front is moving in, it might be better to wait. Even if you can heat the interior, extreme cold on the exterior of a wall can create a “cold bridge” that interferes with the curing process.
You should also check for humidity levels. High humidity combined with cold temperatures can lead to condensation on the studs. If you spray foam over a thin layer of frost or moisture, the foam will slide off or trap water against your structure, leading to rot.
Leaving failed foam in place can be more expensive than the repair itself. Gaps in the insulation allow warm, moist air to hit cold surfaces, which creates mold. Market data suggests that homes with proper airtight seals save up to 50 percent on monthly heating costs compared to those with failed or poorly installed barriers.
Fixing a spray foam insulation failure restores these savings and protects the building from structural damage. While the upfront cost of a spray foam repair service might seem high, the long-term protection of property value is a significant factor.
Once the repair is finished, the foam should have a uniform color and texture. It should feel firm like a hard mattress and should not have a strong chemical odor after 24 to 48 hours. If you smell a “fishy” or “burnt” scent, the chemicals may still be off-gassing due to an improper mix.
A professional contractor will often perform a blower door test after the repair. This test depressurizes the house to find any remaining air leaks. It is a data-driven way to prove that the insulation failure solutions actually worked and that your home is now airtight.
Timing is everything when dealing with chemical applications. If your insulation failed in the dead of winter, you might need to install temporary fiberglass batts until the spring. This provides some warmth while you wait for a window. Ambient temperatures are manageable for the spray equipment.
However, if the repair is urgent, a specialized crew can build a “heated tent” around the work area. This involves using heavy plastic sheeting and industrial heaters to create a micro-climate. This allows them to fix a spray foam insulation failure even when it is snowing outside.
When your insulation fails, you need a partner who understands the science behind the chemicals. All Foam & Insulation, LLC provides expert diagnostic services to find out exactly why your foam didn’t bond. They offer a comprehensive spray foam repair service that handles everything from the initial removal of bad material to the final application of high-quality foam. You can reach their team at (541) 826-9600 or email [email protected] to schedule an inspection. If you want to see their location or get directions, visit them at https://maps.app.goo.gl/zLL2ZAvJe7UBEnFG7 for more details. They can provide a free quote to help you get your project back on track
Repairing failed spray foam requires patience and the right environment. You must remove the bad material, heat the area properly, and use the correct seasonal chemical blend. By following these steps and working with experienced professionals, you can ensure your home stays warm and efficient for years to come. Always prioritize temperature control and surface cleanliness to get the best results from your insulation investment.
No, you cannot. New foam will not bond to unreacted chemicals or dust from failed foam. You must remove the old material down to the substrate to create a clean surface for the new application.
Usually, no. Once the foam has fully cured, which typically takes 24 hours, it is stable. The danger is only during the liquid-to-solid transition when the chemical reaction is active.
This depends on your policy and why the foam failed. If it was due to a contractor error, their professional liability insurance should cover it. Most standard homeowner policies do not cover “faulty workmanship.”
Most manufacturers recommend keeping the “A” and “B” components between 70 and 80 degrees Fahrenheit in the drums. The hose heat is usually set much higher to account for heat loss as the liquid travels to the spray gun.
© 2025 Crivva - Hosted by Airy Hosting Managed Website Hosting.


