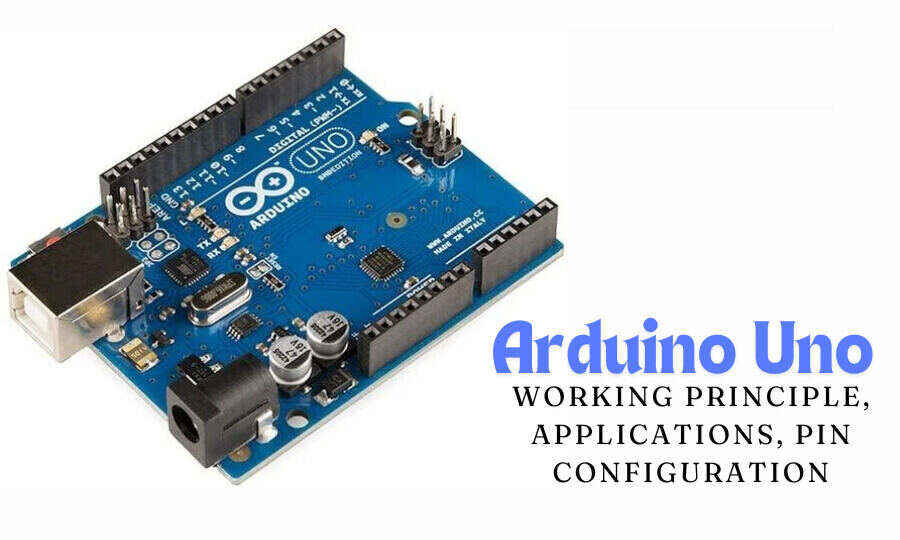
Arduino boards make electronics easy for both beginners and experts. The Arduino Uno is one of the most popular microcontroller boards because it is simple, flexible, and works with many sensors and modules. If you are new to Arduino, learning about the Arduino Uno pin diagram and configuration is important.

This guide will explain the Arduino Uno board, its pins, and how it compares to other models such as the Arduino Nano board. We will also introduce the Arduino Nano with headers by Magnificette, which is a compact and powerful option for your projects.

What Is The Arduino Uno Board?

The Arduino Uno board is built with an ATmega328P microcontroller with multiple input and output pins. It can control LEDs, motors, sensors, and displays. Its key features include:

  • 14 digital input/output pins (6 can be used as PWM outputs)
  • 6 analog input pins
  • USB port for programming and power
  • 16 MHz quartz crystal
  • Power jack for external power supply
  • ICSP header for direct programming
  • Reset button to restart the board

The board is open-source, easy to program, and great for all skill levels.

Arduino Uno Pin Diagram

1. Power Pins

  • VIN: Connects an external power source (7-12V).
  • 5V: Powers sensors and modules with 5V.
  • 3.3V: Supplies 3.3V for low-power devices.
  • GND (Ground): Multiple ground pins to complete the circuit.

2. Analog Pins (A0 – A5)

The six analog input pins (A0 to A5) read signals from sensors such as temperature sensors and light sensors. These pins convert the signals to values ​​between 0-1023 using a 10-bit ADC (analog to digital converter).

3. Digital I/O Pins (0-13)

The 14 digital pins (0 to 13) can be used as inputs or outputs to control devices such as LEDs, motors, and buzzers.

  • Pins 0 and 1 (RX, TX): Used for serial communication.
  • Pins 2 to 13: General input/output pins.
  • Pins 3, 5, 6, 9, 10, and 11: PWM output pins to control motor speed and LED brightness.

4. Communication Pins

  • SPI (Serial Peripheral Interface): Uses pins 10 (SS), 11 (MOSI), 12 (MISO), and 13 (SCK) to connect to devices such as SD cards.
  • I2C (Inter-Integrated Circuit): Uses A4 (SDA) and A5 (SCL) to communicate with I2C devices.
  • UART (Universal Asynchronous Receiver-Transmitter): Uses pins 0 (RX) and 1 (TX) for serial communication.

5. Reset Pins

The Reset (RST) pin allows you to restart your project. You can also use the reset button on the board.

Why Choose The Arduino Nano With Headers by Magnificette?

The Arduino Uno board is great, but some projects need a smaller and more flexible option. That’s where the Arduino Nano with Headers by Magnificette comes in handy.

Why choose the Arduino Nano with Headers?

  • Compact size – Smaller than the Uno, perfect for tight spaces.
  • Pre-soldered headers – Works directly with a breadboard.
  • Same power as the Arduino Uno – Runs on the ATmega328P chip.
  • Micro-USB port – Uses a small and modern connection.
  • Great for robotics and IoT – Perfect for automation and wearable tech.

If you need a compact yet powerful board, try the Arduino Nano with Headers by Magnificette.

Arduino Uno vs. Arduino Nano: Which One To Choose?

Both the Arduino Uno board and the Arduino Nano board work well, but they serve different needs.

Feature

Arduino Uno Board

Arduino Nano Board

Size Bigger Smaller
USB Port Standard Type-B Micro-USB
Breadboard Compatibility Needs jumper wires Fits directly
GPIO Pins 14 Digital, 6 Analog 14 Digital, 8 Analog
Best For Beginners, general use Compact projects, prototyping

If you’re just starting, the Arduino Uno board is the easiest to use. But if you need a compact, solderable, and powerful board, the Arduino Nano Every with Headers is a great choice.

Conclusion

Learning about Arduino Uno pin diagrams and configurations is key to making projects efficient. From simple LED circuits to automation systems, knowing what each pin does will help you a lot.

For projects that require a smaller board with the same power, the Arduino Nano Every with Headers by Magnificette is a great choice. It’s compact, pre-soldered, and great for advanced applications.

Ready to improve your projects? Get the Arduino Nano with headers from Magnificette today and make your electronics smarter!

You might read like this – PCB Connector Types

What are PCB Connectors?

PCB connectors are essential parts of printed circuit boards found in most modern devices. They connect components, enabling power, signals, or data to flow. These connectors are usually green and have grooves, lines, and connections. They come in single or double-sided designs and often have multiple layers for better performance.

Trace width is an important part of PCB design. It determines how much current can pass through the board. Using a trace width calculator ensures that the board can handle the right amount of current.

Types of PCB Connectors

PCB connectors come in many forms to match the needs of different devices. Here are the most common types:

1. Terminal Block Connectors

These connectors have a housing and wires that can be easily removed. They are great for temporary connections and are easy to replace.

2. Post Connectors

Post connectors use screws and clamps to secure connections. They are often used in audio systems and test equipment.

3. Plug and socket connectors

These connectors are very common. They have male and female parts that fit together in one direction. They are used to power devices and transfer data.

4. Card edge connectors

Card edge connectors connect expansion slots to the PCB, allowing them to work together.

5. Backplane connectors

Backplane connectors work like a motherboard, connecting multiple PCBs.

6. Board-to-board connectors

These connectors connect directly to two PCBs using pins and receptacles.

Specialized PCB Connectors

Magnificette offers high-quality PCB connectors for specialized needs:

  • JST Connectors: Perfect for permanent connections that rarely need to be removed.
  • RF Connectors: Used in radios and older TV systems.
  • Pin Header Connectors: Found in desktops to transfer power and video.

USB connectors

USB connectors are used in many devices today. They have at least four contact points for power and data transfer:

  • USB-A: Standard connectors on computers and accessories.
  • USB-B: Found in older devices like music players.
  • USB-Micro: Common in phones, tablets, and compact gadgets.
  • USB-C: The latest type that handles power, data, and video in a single connection.

Audio Connectors

Audio connectors are still used for headphones and sound systems, although Bluetooth is now more common:

6.35mm (¼”): Used in musical instruments and amplifiers.

3.5mm (1/8”): Common for headphones and multimedia devices.

2.5mm: Rare, used for both microphones and headphones in one plug.

Power Connectors

These connectors are used to deliver power:

  • Barrel Connectors: Durable and easy to use for different power levels.
  • Molex Connectors: Found in older computers, handle high currents.
  • IEC Connectors: Used for direct AC power in desktops and older electronics.

Prototyping and Testing Connectors

These connectors are ideal for temporary setups:

  • Banana Connectors: Used in test equipment such as multimeters.
  • Alligator Clips: Great for quick and temporary connections.
  • IC Clips: Connect to specific pins for detailed testing.

Conclusion

PCB connectors are critical to modern electronics, ensuring smooth power and data transfer. Magnificette offers reliable PCB connectors for a variety of needs, supporting reliable performance in electronic components. From test setups to permanent connections, these connectors are essential for building advanced electronic devices.

© 2024 Crivva - Business Promotion. All rights reserved.