This article explores everything you need to know about ceiling fan mounting boxes, including their types, installation process, safety guidelines
When it comes to installing a ceiling fan, one of the most overlooked yet crucial components is the ceiling fan mounting box. It might seem like a minor detail, but choosing the right mounting box ensures not only the fan’s secure attachment but also the safety of the entire installation. Improper mounting can lead to wobbly fans, short circuits, or worse—an unstable ceiling structure.
A ceiling fan mounting box, also known as a fan-rated electrical box, is a special type of junction box that is designed to support the weight and motion of a ceiling fan. Unlike regular electrical boxes used for lighting fixtures, ceiling fan boxes are reinforced to handle dynamic loads from the fan’s operation.
These boxes are typically made of metal or high-strength plastic and are tested to support weights of up to 70 pounds or more, depending on the design. They also include specific anchoring mechanisms to ensure they remain securely fixed to the ceiling joists.
Many homeowners assume that if a light fixture can hang from a standard electrical box, a ceiling fan can too. This is a dangerous misconception. A ceiling fan’s rotating blades exert a constant torque and vibration that can easily loosen or break a standard electrical box, leading to damage or injury.
Regular boxes are only rated for 10 to 15 pounds—nowhere near the support needed for a typical 30- to 50-pound ceiling fan. That’s why using a UL-listed fan-rated mounting box is mandatory for any ceiling fan installation.
Metal mounting boxes offer high strength and durability. They are often preferred for heavy-duty installations and can be directly attached to joists or support bars. These boxes are grounded and work well in most types of ceilings.
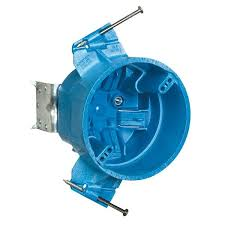
Made of durable thermoplastics, these are lighter than metal boxes but still rated for ceiling fan use. However, they must be clearly marked as fan-rated and include proper reinforcement and mounting hardware.
These come with an adjustable brace that fits between ceiling joists, allowing for secure installation even when a joist is not directly above the desired fan location. Ideal for retrofitting fans into finished ceilings.
These are designed to be installed during the construction phase when ceiling framing is exposed. They attach directly to joists or trusses and offer the most secure installation for ceiling fans.
When selecting a ceiling fan box, consider the following:
Weight Rating: Make sure it supports at least 50 pounds.
Fan-Rated Certification: Look for “UL-listed for fan support.”
Ceiling Type: Match the box type to your ceiling (joist-mounted, brace-mounted, etc.).
Material Preference: Metal for strength; plastic for corrosion resistance.
Wiring Needs: Choose a box with enough space for wiring connections.
Here is a general overview of how to install a ceiling fan mounting box in a typical home ceiling:
Safety first. Shut off power at the circuit breaker to avoid electrical shock.
Remove the old light fixture and carefully detach the standard electrical box. This may involve unscrewing it from a joist or cutting through drywall.
If a ceiling joist is accessible, use a joist-mounted fan box. Otherwise, use a brace-mounted box that fits between joists.
Joist-mounted: Screw the fan-rated box directly into the joist.
Brace-mounted: Extend the brace and twist it until it anchors tightly between joists. Then, attach the box to the brace.
Pull the electrical wires through the box, strip them, and get them ready for the fan connection. Use cable clamps if required.
Follow the manufacturer’s instructions to install the fan bracket, downrod, and motor assembly. Attach the blades and test the fan to ensure it’s operating smoothly.